Sunday, August 30, 2009
Breadsticks and Pizza Dough
Breadsticks & Pizza Dough
Recipe from OurBestBites.com
1 1/2 c. warm (105-115 degrees) water
1 Tbsp. sugar
1 Tbsp. yeast
1/2 tsp. salt
3-4 1/2 c. flour
In a large bowl (the bowl of your mixer, if you have one), combine water, sugar, and yeast. Let stand for 10 minutes or until yeast is bubbly.
Add salt and stir. Add 1 1/2 c. flour and mix well. Gradually add more flour (usually between 3-4 cups, depending on your elevation and your humidity) until dough starts to pull away from the sides of the bowl and it barely sticks to your finger.
Spray a glass or metal bowl with cooking spray and place dough in the bowl. Cover and allow to rise for 45 minutes or until doubled in bulk.
Remove from bowl and place on a lightly-floured surface. Spray a baking sheet with cooking spray. Roll into a rectangle and cut into 12 strips with a pizza cutter.
Roll out each piece of dough into a snake and then drape over your forefinger and twist the dough. Place on baking sheet and repeat with remaining 11 pieces of dough. Try to space them evenly, but it's okay if they're close; pulling apart hot bread is one of life's greatest pleasures!
Cover pan and allow dough to rise for another 30 minutes. When there's about 15 minutes to go, preheat your oven to 425. When done rising, bake for 10-12 minutes or until golden brown. Rub some butter on top of the breadsticks (just put a ziploc bag on your hand, grab some softened butter, and have at it) and sprinkle with garlic bread seasoning or the powdery Parmesan cheese in a can and garlic salt. Or you could sprinkle them with cinnamon sugar.
The Best Biscuit Recipe
I made these great biscuits for breakfast and my husband thought they were great. He said I could throw out all my other biscuit recipes because this one was the best!
Flaky Buttermilk Biscuits
As seen on Sisters Cafe
2 cups all-purpose flour (9 ounces)
2 1/2 teaspoons baking powder
1/2 teaspoon salt
5 tablespoons chilled butter, cut into small pieces
3/4 cup fat-free buttermilk
3 tablespoons honey
1. Preheat oven to 400°.
2. Weigh or lightly spoon flour into dry measuring cups; level with a knife. Combine flour, baking powder, and salt in a large bowl; cut in butter with a pastry blender or 2 knives until mixture resembles coarse meal. Chill 10 minutes.( I didn't do this)
3. Combine buttermilk and honey, stirring with a whisk until well blended. Add buttermilk mixture to flour mixture; stir just until moist.
4. Turn dough out onto a lightly floured surface; knead lightly 4 times. Roll dough into a (1/2-inch-thick) 9 x 5–inch rectangle; dust top of dough with flour. Fold dough crosswise into thirds (as if folding a piece of paper to fit into an envelope). Reroll dough into a (1/2-inch-thick) 9 x 5–inch rectangle; dust top of dough with flour. Fold dough crosswise into thirds; gently roll or pat to a 3/4-inch thickness. Cut dough with a 1 3/4-inch biscuit cutter to form 14 dough rounds. Place dough rounds, 1 inch apart, on a baking sheet lined with parchment paper. Bake at 400° for 12 minutes or until golden. Remove from pan; cool 2 minutes on wire racks. Serve warm
Microwave Chocolate Cake in 12 Minutes
Use Pampered Chef Stoneware Fluted Pan
Chocolate cake mix
3 eggs
16 oz sour cream
1 cup chocolate chips
1 can frosting
Mix, batter will be thick
Spray your stoneware fluted pan with Pam, Put the entire container of canned frosting in the bottom of the pan.Mix eggs,sour cream and chocolate chips together(batter will be thick). Put the cake mixture on top of the frosting then cook on high for approx. 12 minutes in your microwave. Begin testing at 11 minutes at 30 sec. intervals checking to see if cake is done.
It is usually done in 12 minutes DEPENDING ON THE WATTAGE of you microwave.
Allow to cool at least 10 minutes, turn out onto serving plate - sprinkle with powdered sugar or nuts (for a really final touch fill center with strawberries!) - simple, delicious & no need to turn on your regular oven!
Alternatively, try substituting any can pie filling for the sour cream and use your favorite flavor of cake mix.
Wednesday, August 26, 2009
Saturday, August 22, 2009
Milk Boiled Corn onThe Cob
Milk Boiled Corn on the Cob Recipe
This is the BEST recipe for corn on the cob --- do not add in any salt to the water as it will make the corn tough
15 min | 5 min prep
SERVES 6 -8
• 6-8 ears corn, husks and silk removed
• water
• 1 cup milk
• 1/4 cup whipping cream, unwhipped (or use 1-1/4 cups milk)
• 1/3 cup sugar (can use more sugar)
• 1/4 cup butter (optional and to add to the water)
1. Fill a large stock pot half full with water (use a large enough pot to hold all the corn).
2. Add in the cream, milk, sugar and butter.
3. Bring to a boil, then add in the corn cobs.
4. Reduce heat to a simmer and allow corn to cook for 7-8 minutes or until just tender, depending on size of corn try not to over cook the corn as it will become tough.
5. Using long tongs remove and place on a plate or in a bowl, then cover with foil until ready to serve.
6. Serve with butter and salt to taste.
7. Delicious!
Sunday, August 9, 2009
Chicken Fried Steak
We went to Gren River to see my Family and my sister Tonya made us a great dinner of Chicken Fried Steak. I realized I hadn't ever posted my recipe so here it is. The ultimate farm comfort food.
Chicken Fried Steak with Pan Drippings Cream Gravy
Serves 4 to 5
Chicken-fried steak is beef, usually round steak, tenderized, then dipped in a mixture of egg and milk. Country fried steak is another name for the dish, often made without the egg batter. Just dredge in seasoned flour, without the egg coating. The dish is known as chicken fried steak because of the similar cooking method to fried chicken.
This recipe calls for cube steaks, but a good round steak will also do. Just ask your local butcher to run them through the tenderizer. You can tenderize them yourself with a mallet. (A suggested method is listed below for you.)
4 cube steaks, tenderized beef cutlets. (Follow Safe Food Handling Instructions)
OR, that you've tenderized yourself (see next step)
Cut a 1-1/2 to 2 pounds round steak into 4 or 5 serving-size portions.
Place the cut pieces between sheets of plastic wrap or wax paper.
On a strong surface, pound with a meat mallet until thin and tender.
1 large fresh egg, beaten, for dip.
1/4 cup of fresh milk for dip, check the expiration date.
1 1/2 cups, all purpose flour.
Cooking oil or melted shortening, as required.
1/2 teaspoon salt, plain or iodized.
1/2 teaspoon freshly ground black pepper.
1/4 teaspoon Paprika.
1 cup of fresh milk, (room temperature) for pan gravy.
1/2 to 3/4 cup of water, for pan gravy.
1. Beat together the egg and milk mixture and set aside.
2. Mix together the salt, black pepper, and paprika and sprinkle on both sides of beef cutlets. Add leftover spice mixture to the flour.
3. Dredge the chicken fried steak cutlets in flour, seasoned with salt, pepper, and paprika, shaking off the excess flour.
4. Then dip each cutlet in the egg and milk mixture, then back into the seasoned flour. (Your hands are going to get messy at this point in the recipe, or use a pair of metal cooking tongs.)
5. Set the coated cutlets aside on a piece of waxed paper. HINT: Save the extra seasoned flour for the gravy.
6. Heat the cooking oil in a large cast-iron or other heavy skillet over medium-high heat for a few minutes. Oil should be about a half-inch deep in the pan. Check the temperature with a drop of water; if it pops and spits back at you, it's ready for the chicken fried steak cutlets.
7. With a long-handled tong or a fork, carefully place each chicken fried steak cutlet into the hot oil. Cooking Caution: Protect yourself from the popping grease that may result when the moist cutlet enters the hot oil.
8. Fry cutlets on both sides, for about 2 to 3 minutes per side, turning once, until goldish brown.
9. Reduce the heat to low, cover skillet and cook 4 or 5 minutes more, or until cutlets are cooked through.
10. Drain the hot cutlets on paper towels. Keep the chicken fried steak warm by wrapping in foil and keeping in a warm oven.
Saturday, August 8, 2009
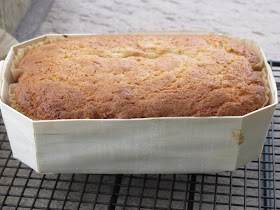
Buttermilk Banana Bread
I came across this version of banana bread this morning. I gave it a try and was thrilled with the results. It baked evenly and was perfect in taste and texture. It has a light buttery banana taste. My kids asked if I would make it again tomorrow. Thanks Melanie for sharing such a great recipe.
Buttermilk Banana Bread
from My kitchen Café
1/2 cup butter, softened
1 1/2 cups sugar
2 eggs, well beaten
1 cup mashed bananas (about 3 average sized bananas)
4 tablespoons buttermilk
1 3/4 cups flour
1 teaspoon baking powder
1/4 teaspoon salt
1/2 teaspoon vanilla
dash baking soda
You can add 1 Cup of nuts if you like
Cream butter and sugar together. Add eggs, bananas, buttermilk and vanilla. In a separate bowl mix dry ingredients. Add dry ingredients to banana mixture. Mix until combined. Divide batter into greased and floured bread pans and bake at 350 degrees for 50-55 minutes or until a toothpick comes out clean. This recipe makes about one large loaf of banana bread . I used (2) 7x4x2 3/8 Pani Mold Baking Baskets I found online. I tied a clear bread sack with natural raffia , It gave it a great presentation for giving to a kind neighbor.
Wednesday, August 5, 2009
Kari's Cheesecake
I got this great cheesecake recipe from a hygienist in one of the dental offices I work with. It has all the flavor of a traditional baked cheesecake but it is light and creamy in texture. Try it, you won't be disappointed. I topped mine with my razzleberry pie filling yummmmmmmmy!
Kari's Cheesecake
Crust:
2 Cups of graham cracker crumbs
6 tsp butter
3/4 C. sugar
Melt butter and add sugar and graham cracker crumbs. Press into a springform pan and bake @ 325 * for 5 minutes
Remove crust from oven and lower temp to 300*
Filling
3 8 oz pkg of cream cheese
1 Cup of Sour Cream
1 Cup Heavy Whipping Cream
1 Cup Sugar
3 TBSP. Flour (I mix my flour and sugar together before adding to the mixture)
4 eggs
Mix together using a food processor or mixer adding eggs last.
Pour into crust. Place a cookie sheet on the rack below with 1/2 inch of water(this is needed for moisture) I put a cookie sheet with water directly under my springform pan I wrapped the outside with heavy foil to prevent any water from getting inside.
1. Bake for 1 hour @ 300* Shut off oven , and don't open the door.
2. Keep oven door for an additional hour.
3. Open the oven door and keep cheesecake inside for the final hour **do not move cheesecake until the end of the third hour (This is a 3 hour process and well worth it). Refrigerate overnight or place in the freezer for 3 hours.
ENJOY!
Tuesday, August 4, 2009
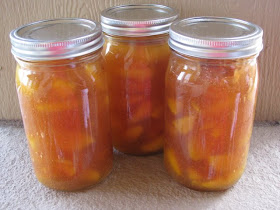
Canning Razzleberry Pie Filling
Canned Berry Pie Filling
1 cup granulated sugar
1/4 cup plus 1 Tbsp Clearjel (use regular, not instant Clearjel)
1/4 tsp cinnamon (optional)
1-1/3 cups cold water
1 Tbsp plus 1 tsp lemon juice
3-3/4 cups fresh berries (Marionberry, Loganberry, blackberry, raspberry) **
Wash one quart jar. Keep hot until needed. Prepare lid as manufacturer directs.
Combine sugar, Clearjel and cinnamon (if desired) in a large saucepan. Add water. Stir mixture and cook over medium-high heat until mixture thickens and begins to bubble. Add lemon juice and boil for 1 minute, stirring constantly. Fold in berries.
Ladle hot filling into hot jar, leaving 1/2-inch headspace. Wipe jar rim with a clean, damp cloth. Attach lid. Process in a boiling water canner for 30 minutes.
Yield: 1 quart
* This recipe is for one quart of pie filling. The amounts can be multiplied by the number of quarts needed (up to 7 quarts at a time).
** Frozen berries may be used. If they're sweetened, rinse off while the fruit is frozen. Thaw and drain juice away from berries. Measure drained fruit, and use the juice in place of the water, adding water to measure 1-1/3 cups.
Canning Peach Pie filling
Directions for Making Peach Pie Filling( courtesy of Pick your own ) click on pick your own and get step by step photos etc.
Ingredients and Equipment to make 1 quart of peach pie filling
(just double to make 2 quarts, etc.) up to 7 quarts
Ingredients for Peach Pie Filling
Quantities of Ingredients Needed For
1 Quart
Sliced fresh peaches 3-1/2 cups
Granulated sugar 1 cup
Clear Jel® powder, see below 1/4 cup + 1 tablespoon
Cold water 3/4 cup
Cinnamon (optional) 1/8 teaspoon
Almond extract (optional) 1/8 teaspoon
Bottled lemon juice 1/4 cup
ClearJel® starch - made specially for home canning, to ensure both safety and quality. ( I bought mine at cash and carry )
Jar grabber (to pick up the hot jars)
Lid lifter (has a magnet to pick the lids out of the boiling water where you sterilize them. ($2 at mall kitchen stores and local "big box" stores, but it's usually cheaper online from our affiliates)
Jar funnel ($2 at mall kitchen stores and local "big box" stores, but it's usually cheaper online from our affiliates)
At least 1 large pot
Large spoons and ladles
Ball jars (walmart and other grocery stores and some "big box" stores carry them - about $8 per dozen quart jars including the lids and rings)
1 Water Bath Canner (a huge pot with a lifting rack to sterilize the jars of peach pie filling after filling (about $30 to $35 at mall kitchen stores and local "big box" stores, but it's usually cheaper online from our affiliates) You CAN use a large pot instead, but the canners are deeper, and have a rack top make lifting the jars out easier. If you plan on canning every year, they're worth the investment.
Recipe and Directions
Step 1 - Selecting the peaches
You can use fresh or even frozen peaches, but obviously you'll get the best price and freshest taste if you go pick your own. Typically, peaches are in season in the US and Europe in June through August - check the harvest calendar for your state!
Step 2 - Wash the jars and lids
Now's a good time to get the jars ready, so you won't be rushed later. The dishwasher is fine for the jars; especially if it has a "sterilize" cycle, the water bath processing will sterilize them as well as the contents! If you don't have a dishwasher with a sterilize cycle, you can wash the containers in hot, soapy water and rinse, then sterilize the jars by boiling them 10 minutes, and keep the jars in hot water until they are used. Leave the jars in the dishwasher on "heated dry" until you are ready to use them. Keeping them hot will prevent the jars from breaking when you fill them with the hot peach pie filling.
Put the lids into a pan of hot, but not quite boiling water (that's what the manufacturer's recommend) for 5 minutes, and use the magnetic "lid lifter wand" to pull them out.
Step 3 -Wash the fruit and sort!
I'm sure you can figure out how to wash the fruit in a colander of plain cold water.
Then you need to pick out and remove any bits of stems, leaves and soft or mushy fruit. It is easiest to do this in a large bowl of water and gently run your hands through the fruit as they float. With your fingers slightly apart, you will easily feel any soft or mushy fruit get caught in your fingers.
Then just drain off the water!
Step 4 - Peeling the Peaches
Peaches and nectarines should be peeled, as their skins can be tough / chewy in jam. Peaches have such thin skins, you really don't need to peel them.
For those you want to peel, here's a great trick that works with many fruits and vegetables with skins (like tomatoes): just dip the fruit in boiling water for 30 to 60 seconds.
Remove from the water using a slotted spoon and put into a large bowl or pot of cold water and ice.
The skins will easily slide off now IF the peaches are ripe! The more unripe they are, the longer you'll need to heat them.
Step 5 - Cut up the peaches
Cut out any brown spots and mushy areas. Cut the peaches in half, or quarters or slices, as you prefer! Remove pits!
Step 6 - Prevent the fruit from darkening!
Now, to keep the fruit from turning brown, when you get a bowlful, sprinkle 1/4 cup lemon juice or Fruit-Fresh (which is just citric acid, vitamin C, perfectly natural). Then stir the peaches to make sure all the surfaces have been coated.
Step 5 - Make the liquid for the filling
Combine water, sugar, Clear Jel®, and, if desired, cinnamon and/or almond extract in a large kettle. Stir and cook over medium high heat until mixture thickens and begins to bubble. 1 Quart 7 Quarts
Granulated sugar 1 cup 7 cups
Clear Jel® see below 1/4 cup + 1 tablespoon 2 cups + 3 tablespoon
Cold water or peach juice 3/4 cup 5-1/4 cups
Cinnamon (optional) 1/8 teaspoon 1 teaspoon
Almond extract (optional) 1/8 teaspoon 1 teaspoon
Bottled lemon juice 1/4 cup 1-3/4 cups
Note: You can use peach juice instead of water to add the flavor and natural sweetness, but you can just use cold water, as the peach juice can be hard to find.
Add the lemon juice and boil the sauce 1 minute more, stirring constantly.
Why use ClearJel?
ClearJel® is a corn starch that has been modified to give it special and unique characteristics when used in food products. It is recommended by the USDA for making pie fillings because it does not break down in the acid food mixtures and does not thicken too much during heat processing to interfere with the intended effect of the heat on killing bacteria during canning. In other words it reduces spoilage and is safer than corn starch. It is preferred for thickening canned pie fillings as well as other foods over other corn starches because it has less or no aftertaste, the thickened juices are smooth and clear, and foods thickened with ClearJel® may be frozen.
Step 6 - Combine the liquid with the fruit
Add in the drained peach slices and continue to heat mixture for 3 minutes. (see photo at right)
Step 7 - Fill the jars with the peach mixture
Pretty self explanatory. A jar funnel helps. Gently jostle the jar to help it settle in the jar and reduce the amount of air space. Fill the quart jars to within 3/4 to 1 inch of the top, wipe any spilled peach pie filling of the top, seat the lid and tighten the ring around them.
Step 8 - Process the filled jars in the water bath
Put the filled jars in the canner and keep them cover with at least 1 inch of water and boiling. if you are at sea level (up to 1,000 ft) boil pint and/or quart jars for 30 minutes.
If you are at an altitude of 1,000 feet or more, see this chart.
USDA-Recommended process time for Hot Pack Pint or Quart Jars of Peach Pie Filling in a boiling-water canner.
Process Time at Altitudes of
0 - 1,000 ft 1,001 - 3,000 ft 3,001 - 6,000 ft Above 6,000 ft
30 min 35 40 45
Step 9 - Remove and cool the jars - Done
Lift the jars out of the water and let them cool without touching or bumping them in a draft-free place (usually takes overnight) You can then remove the rings if you like. Once the jars are cool, you can check that they are sealed verifying that the lid has been sucked down. Just press in the center, gently, with your finger. If it pops up and down (often making a popping sound), it is not sealed. If you put the jar in the refrigerator right away, you can still use it. Some people replace the lid and reprocess the jar, then that's a bit iffy. If you heat the contents back up, re-jar them (with a new lid) and the full time in the canner, it's usually ok.
--------------------------------------------------------------------------------